


Hey everyone, it's Luis & Rui here with another AI tutorial!
Ever feel like your inbox is a wild party that got way out of control?
If you’re tired of spending precious time sorting through endless emails, we've got something fun and practical for you.

In today's tutorial, you’ll learn how to build an automation that:
Watches new emails in your inbox.
Sends the email content to ChatGPT.
Classifies or tags the email based on ChatGPT’s response.
Applies a Gmail label automatically—no manual triage required.
Prerequisites
Gmail account (with IMAP/POP access enabled if needed).
Make.com account (free tier is enough to get started).
OpenAI API key (to connect ChatGPT within Make.com).
Step-by-Step Setup
1. Create a New Scenario in Make
Log in to Make.com and click Create a new scenario.
You’ll see a blank canvas where you can add modules (the circles).

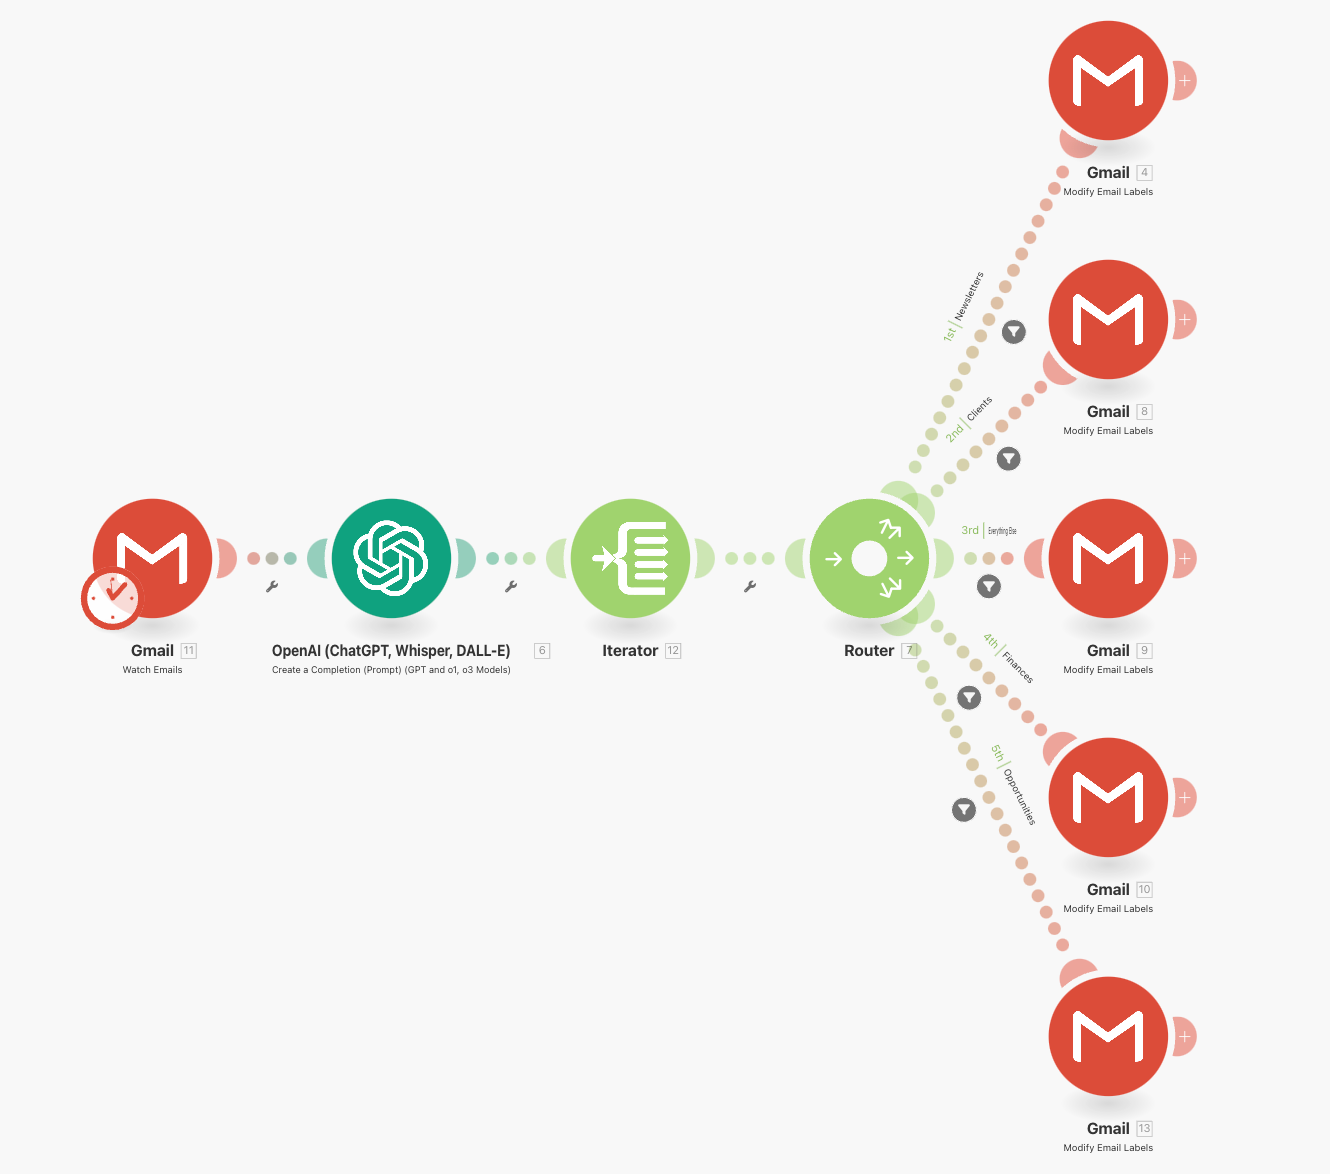
2. Start with the Gmail “Watch Emails” Module
Search for the Gmail app in the module search bar.
Select Watch Emails.
Connect your Gmail account to Make (if you haven’t already).

Configure the module:
Folder: Choose
All Emailsif you want to monitor all emails (or whichever folder you want to monitor).Criteria: Set to
Unreadif you only want to process new, unread emails or All emails for al.Maximum number of results: This setting determines how many emails the automation should read each time it is triggered. The ideal number depends on the volume of emails you receive and how frequently you plan to trigger the automation.
If you trigger the automation every 15 minutes, you can set a lower number.
If you run the automation once a day, set a higher number to ensure no emails are missed.

3. Add the OpenAI (ChatGPT) Module
Click the plus sign (+) to add another module.
Search for OpenAI, then select Create a completion

Connect your OpenAI account by entering your API key.
Prompt Setup: This is where the magic happens. You’ll pass the email’s content into ChatGPT and give the proper instructions to label it accordingly to your preferences.
We like to split the task and the instructions into 2 different messages but you can do the entire prompt in just one message.
Act like an experienced personal assistant. I want you to read the email content and categorise the email with the most appropriate label.

Here is the email content:
{{11.text}}

Choose one of the following labels accordingly to the content of the email.

- Client (if the email comes from X or Y)
- Newsletters
- Sales
- Everything Else
- [ADD ALL THE LABELS AND INSTRUCTIONS YOU WANT]

**IMPORTANT: only give me the final label name and nothing else
The more detailed you are in the instructions the better will be the labelling
Pro tip: give examples of emails for each label
4. (Optional) Use an Iterator if Needed
If you’re dealing with multiple emails in a single run, you need to add an Iterator module. This splits a collection of items so you can process each item (e.g., each email in a thread) individually.
If you only want to handle one email every time the automation runs, you can skip the iterator.

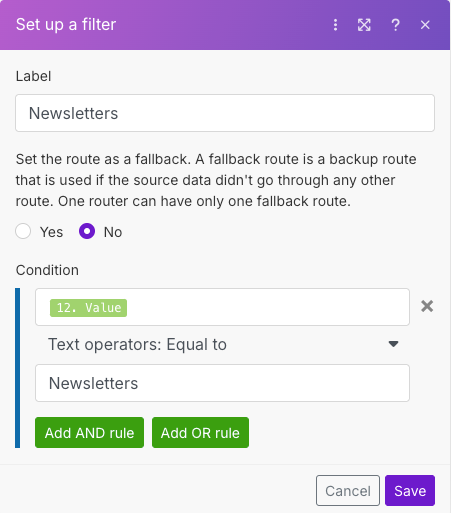
5. Add a Router
Add a Router after the ChatGPT module. This allows you to create different branches based on ChatGPT’s classification.
In each branch, you can set up a Filter to match the classification you expect. For example:
Branch 1 filter:
Text contains "Work"Branch 2 filter:
Text contains "Personal"Branch 3 filter:
Text contains "Promotions"...and so on.
6. Add Gmail “Modify Label” Modules
For each Router branch, add a Gmail > Modify Label module.
Connect it to the same Gmail account.
In the module configuration, pick the label you want to apply (e.g., “Work”, “Personal”, “Promotions”, etc.).
Map the Message ID from the original “Watch Emails” module so Gmail knows which email to label.

7. Test the Scenario
Click Run once to test.
Send yourself a few test emails with different subjects or content.
Watch Make.com pick up the new emails, pass them to ChatGPT, get a classification, and apply the label in your Gmail.
8. Turn It On
Once everything is working as expected, turn the scenario ON in Make.com. Now you can enjoy auto-labeled emails based on AI’s classification.
Tips for Perfecting Your AI Prompt
Be specific: Clearly list possible categories, so ChatGPT doesn’t invent new ones.
Limit the output: Ask ChatGPT to respond with only the label name—this makes filtering easier.
Include examples: If your classification needs more nuance, provide a few examples in the prompt.
Copy-and-Paste Make Scenario
Below is the automation blueprint (scenario file) you can import directly into Make.com.
To import just click Create a new scenario → 3 dots → Import blueprint → Import.


